Teams and Power Virtual Agents
- Ed G.

- Dec 19, 2019
- 4 min read
Last time, we built a code-less chat-bot to go and find us a good place to eat. We used the demo web site built into Power Virtual Agents to test it, and all was well...but what if we wanted to roll the bot out to a larger audience? Maybe, we'd like to copy the Teams functionality of our previous bot. Either way, Power VA makes it easy to publish your bot to several different channels, including your website, a mobile app, Facebook, and (of course) Microsoft Teams.
Reading the documentation, we can see that we first need to publish our bot and then make certain we have adequate permissions to sideload a Teams app. We left off last time just after we published and did a demo, so we should be good to click on Channels, and then to select Teams from the list.

That will bring up a simple dialogue where we can click "Add" to get the App ID for subsequent steps. Be sure to click "Copy" once the ID field is populated.

Next, Microsoft offers two paths to create the app in Teams. While it is possible to create the application's manifest directly, there are a bunch of json schema things which, like the night, is dark and full of terrors (for now).
The other path is to install the Microsoft Teams App Studio, which shows up with all of the other apps inside of Teams. Once in the App Studio, click on "Manifest Editor" at the top, and then "Create a new app".

Creating the new app has a few steps, and the details aren't super clear in the documentation:
"Enter the necessary information about your bot and organization on the App details screen, and then select Bots on the side menu."
The App details screen required some bludgeoning before I understood what was needed, and how to work around some things to test my bot.
Working down the form, the only weird thing on the first part is the App ID field seems like a good place to paste the App ID from your Power Virtual Agents. It's not. We'll need that later, but for now, just fill out the Short and Long Names and then click the "Generate" button to create the unique identifier of your Teams App.

In the next part, I had to make up a package name and version number. Then provide a short and long description for the Teams app. Note that it will get cranky if the long description contains the exact phrase from the short description over and over #dontaskmehowiknow. Feel free to use your favorite text generator to get through to your own demo.

The next part is "Developer Information" and is pretty self-explanatory. It's kind of cool to see the name change in the top left once you put yours in there.
Following that, you'll need to provide both the Privacy Statement and Terms of Use URL's to test your app. Teams is smart enough to know that you just put in your own website twice (again, #dontaskmehowiknow), so for testing purposes only, I copied someone else's. Credit John Liu for also suggesting adding a bookmark tag to the end of your own URL (it doesn't have to be a valid tag): https://www.flyingpolymath.com/#privacy and https://www.flyingpolymath.com/#terms seemed to work just as well.

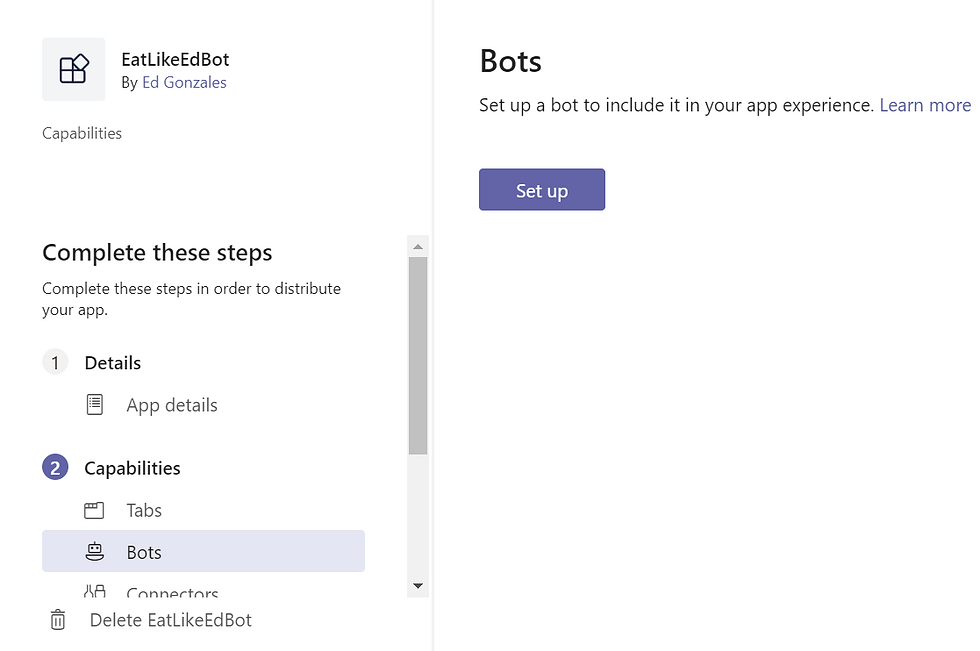
Now, we can move onto setting up the bot. Along the left side, click on "Bots" (near the bottom) and then the "Set-Up" button that appears after.
Choose "Existing Bot" to connect the one you've built in Power Virtual Agents, give it a cool name, and then select "Connect to a different bot id".
This is where you'll paste the App ID from wayyyy up in the beginning, and then select "Personal" for the scope at the bottom and click "Save".
Scrolling down on the left rail, you'll see the option to "Test and Distribute". Clicking that will provide three options to share your Teams app:
Install - Lets you install the app directly to your Teams app, just as you would any other app from the app store.
Download - You may not have permissions to install an app directly, or you may want to share the app with some of your coworkers, but not with the whole world. This option lets you download a file, and then side-load it into Teams. (I'll document that below).
Submit - Is your bot super awesome and you want the whole world to have access to it? Submit it to the app store and give others the chance to see what you've done. You'll probably want to have actual Terms and Privacy Statements, as well as replacing Mr. Goldblum's long description.

Clicking "Download" will generate a .zip file and send it to your default downloads folder. Then, to install the file, click "Apps" in the lower-left corner of Teams and scroll all the way to the bottom to find "Upload a Custom App".
Point the dialogue to the .zip file you just downloaded, and your app should appear in the Built for <tenant domain> section just above "Top picks".
Then, you can select your app from the list and install it into Teams. It should automatically come up to start chatting, but if it doesn't, you can just start a chat as you would any other.

I really enjoyed creating the bot, and then having it accessed in such a professional manner through Microsoft Teams. It is empowering for someone, like myself, with little-to-no development experience to be able to do stuff like this. I hope you'll be able to apply your own use-case and do something equally fun with your Virtual Agent.
Get in, make mistakes, learn some things, and have fun! Try. Fail. Learn. Repeat.


Comments