Birthday Bot - Part Five - Sending Physical Cards Using Power Automate
- Ed G.

- Mar 25, 2020
- 5 min read
In Part Four, we saw how to stage our SMS and eMail birthday messages, which we will send using another flow to be covered later. This week, I'll cover the different aspects of sending a physical card using the third-party service, HandWrytten. There are some steps I took to get the correct ID's for the card categories, and fonts, but their API documentation is well done and they even have a "Test Mode" so you can send an actual order via Power Automate without triggering a card or getting billed.
Getting Card Categories and Font Names
To place an order, we'll use the endpoint singleStepOrder which will require us to know some things ahead of time:
card_id - The unique identifier of the actual card we want to send.Using the same Do Until trick that we used for the Quote Approval, we'll grab a random card from the birthday category.
font_label - The display name of the font you'd like to use for your printed card.To find the right font, you can either check them out through the front end of the website and note the display name or make a GET request to https://api.handwrytten.com/v1/fonts/list
credit_card_id - The unique identifier of the credit card to be used for payment.This is NOT the actual card number, that is never displayed through the API, even when logged in as that user.
To find the card_id, we first need to find out the id for the birthday category. For the next few steps, we can set up a simple flow that has a manual trigger and an HTTP request.

The first part is a quick GET request to:
https://api.handwrytten.com/v1/categories/list
...which will return some JSON that looks like the sample below, I've highlighted the part we're looking for specifically in red:
{
"categories": [
{
"id": "28",
"name": "Customizable Cards",
"checked": true,
"taxonomy": "CUSTOMIZED",
"icon": null
},
{
"id": "7",
"name": "Birthday",
"checked": false,
"taxonomy": "NONE",
"icon": "https://d3e924qpzqov0g.cloudfront.net/cardimages/201710300518_201710090658_present.png"
},
{
"id": "40",
"name": "Real Estate",
"checked": false,
"taxonomy": "NONE",
"icon": "https://d3e924qpzqov0g.cloudfront.net/cardimages/201710300549_201710090749_house.png"
},
Getting the Credit Card ID
Now would be a good time to add a payment method using the HandWrytten website. You can add credit cards to your account using the API, but since I am only adding a single card it won't need to be automated. Doing this will let us grab the id of that payment method, but unlike the previous two GETs, this one will require us to add an API Key to the HTTP call.

To get that key, we'll have to send a quick POST to authorize the account using the credentials we stored in Part Two.
This will return a bunch of JSON that will include a line, "uid": "xbunchacharactersx".
Grab that value and use it inside a Compose for the next request which will get the credit card id.
Note that the method for the Authorization is POST, but for the listCreditCards endpoint, it is GET.

This will return JSON similar to the one below where I've redacted some sensitive information, but you can see it will not return the complete credit card number or expiration date. The highlighted row is the id of the credit card we'll need to process the order later on.

Choosing a Card
Because HandWrytten offers a selection of birthday cards from which to choose, I thought it would be fun to grab a random one rather than use the same card for every occasion. But because not all cards will be suitable for all birthdays, I built in an approval process using the same Do Until process as the Quote Approval Process in Part Three.

For the Do Until criterion, I will use the varCardID that I set up at the beginning, and I'll change that to the accepted Card ID once accepted. Since the HandWrytten Card ID is a string, I set the default to 'Empty' and have the Do Until loop checking that condition before moving on.
The HTTP request will use the URL for listCards with the qualifier "?category_id=7" (without the quotes) to narrow to just cards in the birthday category.
I'll choose a random card in the next step.
In the next step, I'm reaching into the array returned by the List Cards Business HTTP call and grabbing all of the data from a random row. Using a compose, I use the expression below:
body('List_Cards_Business')?['cards'][rand(0, length(body('List_Cards_Business')?['cards']))]
This returns the JSON below, so I'll need to pick out the bits that I need (in bold).
{
"id": "97",
"name": "Birthday Boy",
"description": "Flat, 5”x7” card paired with a white envelope.",
"cover": "https://d3e924qpzqov0g.cloudfront.net/cardimages/img_5d7c366149eef_cover.jpg",
"cover_width": 1500,
"cover_height": 1071,
"inside_image": "https://d3e924qpzqov0g.cloudfront.net/cardimages/201909141220_blank-7x5_half.jpg",
"price": 3.25,
"category_id": 28,
"category_name": "Customizable Cards",
"category_taxonomy": "CUSTOMIZED",
"available_free": false,
"orientation": "L",
"characters": 500,
"isCustom": false,
"customCardInfo": null,
"closed_height": 5,
"closed_width": 7,
"open_height": 5,
"open_width": 7,
"margin_top": 0.8,
"margin_right": 0.25,
"margin_bottom": 0.4,
"margin_left": 0.25,
"font_size": 33,
"details_size": "7″ x 5″",
"details_envelope": "",
"details_author": "Red Wagon",
"is_inside": true
}
You can see there is a bunch of other information I could use if I wanted to make this bot really robust in future versions. For now, though, I really just need the ID and the Name. Below, I've left the expression so you can see the pattern needed to grab certain values from an output.

Using the same AtBot action, Get choice response from User, we submit the name of the card and ask for approval. Following that up is a simple condition to check the response and then setting the varCardID accordingly:

Placing the Order
Once a card has been approved, the varCardID is set to something other than 'Empty', and we are able to move outside of the Do Until loop. The next step is to place the order using HandWrytten's singleStepOrder call.

Login and password will use the two secure Compose actions we used to get the uid above.
The card_id is the approved card we just chose.
The message is the CardText from the quote approval process in Part Three.
Credit_card_id is the id of the payment method we found above, and all of the sender name and address can be written in to suit your scenario.
Recipient name and address will be the dynamic values from our SP list (be sure to use the business address for this step, and home address for the 'home' part of the method switch).
Finally, font_label is the display name of the font you'd like to use.
After the order is placed, I send a confirmation to the user, and then update the record in the Birthday List to "processed", just as we did in Part Four for the SMS and eMail options.

Home Address and Cleaning Up
Sending a card to the home address is exactly the same, but we just choose the Home information rather than the Business. Easy Peasy, right?
Because there could be an instance where we are processing through multiple birthdays in a single day, we want to make sure we reset the variables we use in our two Do Until loops so that they process correctly for the next birthday.
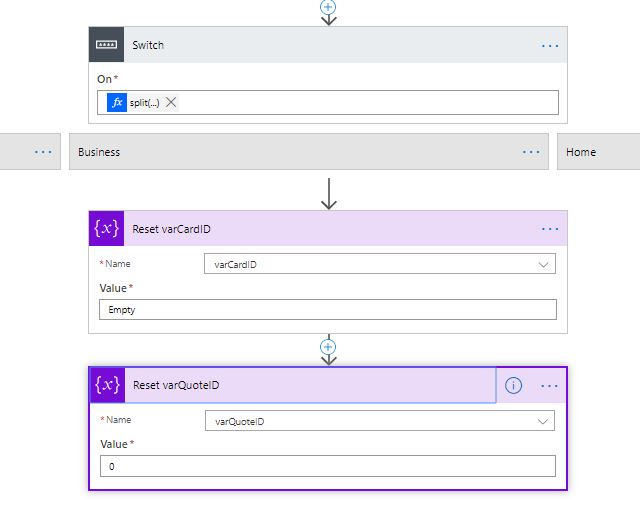
We do this after the switch actions have completed, but before we leave the Apply to each loop from the birthday processing.
To me, this was the most-fun part of this flow. I learned a bunch about API's and could see some cool ways to utilize this particular tool. Imagine being able to set up an automation that sent hand-written Thank You notes as soon as you finished a meeting with a client. This is an excellent customer journey and will definitely set you aside from your competition.
Here are some pictures of a test I sent to a coworker:


Coming up...we'll cover how to send the eMail and SMS options. Until then, check out my latest podcast interview with Dynamics World on advocacy, user adoption, and exploration.
Don't forget to get in, make mistakes, learn some things, and have fun!


Comments